
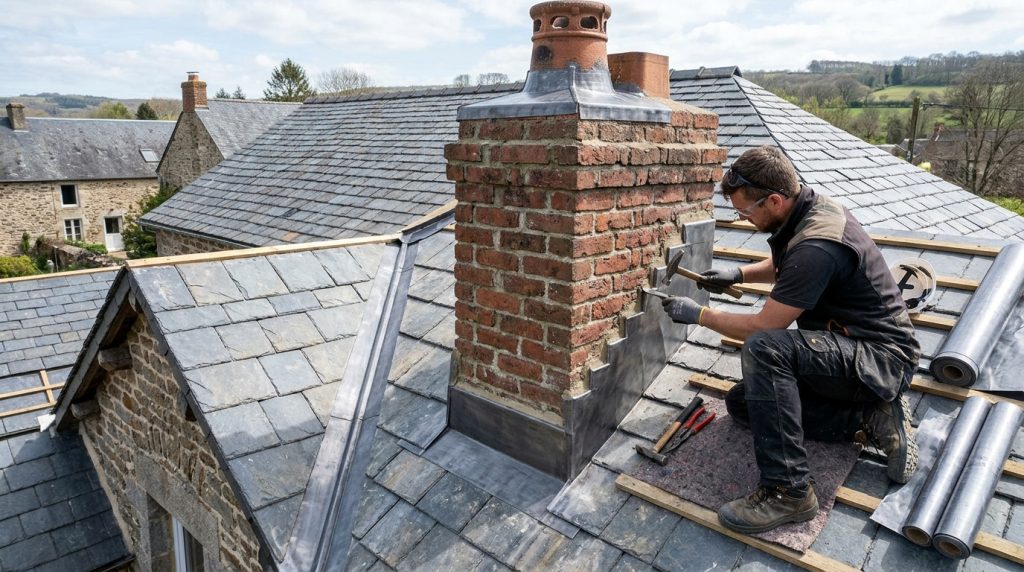
Roof leaks often begin where the roof’s broad, orderly surfaces meet awkward shapes: a chimney rising through the slope or two roof planes joining in a valley. These junctions demand more than a standard strip of metal; they need custom flashings shaped to the roof, the structure and the path water naturally follows.
When designed and installed as part of the roofing system, flashing helps create dependable roof waterproofing, limits moisture intrusion and protects the materials beneath the visible surface. Understanding why these details matter makes it easier to assess a roof’s long-term weather protection and durability.
Understanding custom flashings around chimneys and valleys
A roof covering sheds most rain across its open slopes, but junctions interrupt that flow. Chimneys and roof valleys concentrate water, so small gaps or poorly fitted edges can become persistent routes for moisture.
Custom flashings are formed to suit the dimensions, pitch and materials of a particular roof. Rather than forcing a generic component into an imperfect fit, a roofer can shape the metal to meet the surrounding surfaces and direct water away from vulnerable seams.
Two details illustrate why the fit matters: chimney flashing must work around a vertical structure, while valley flashing must carry runoff down a channel where water from adjoining slopes converges.
Shaping chimney flashing to the roof
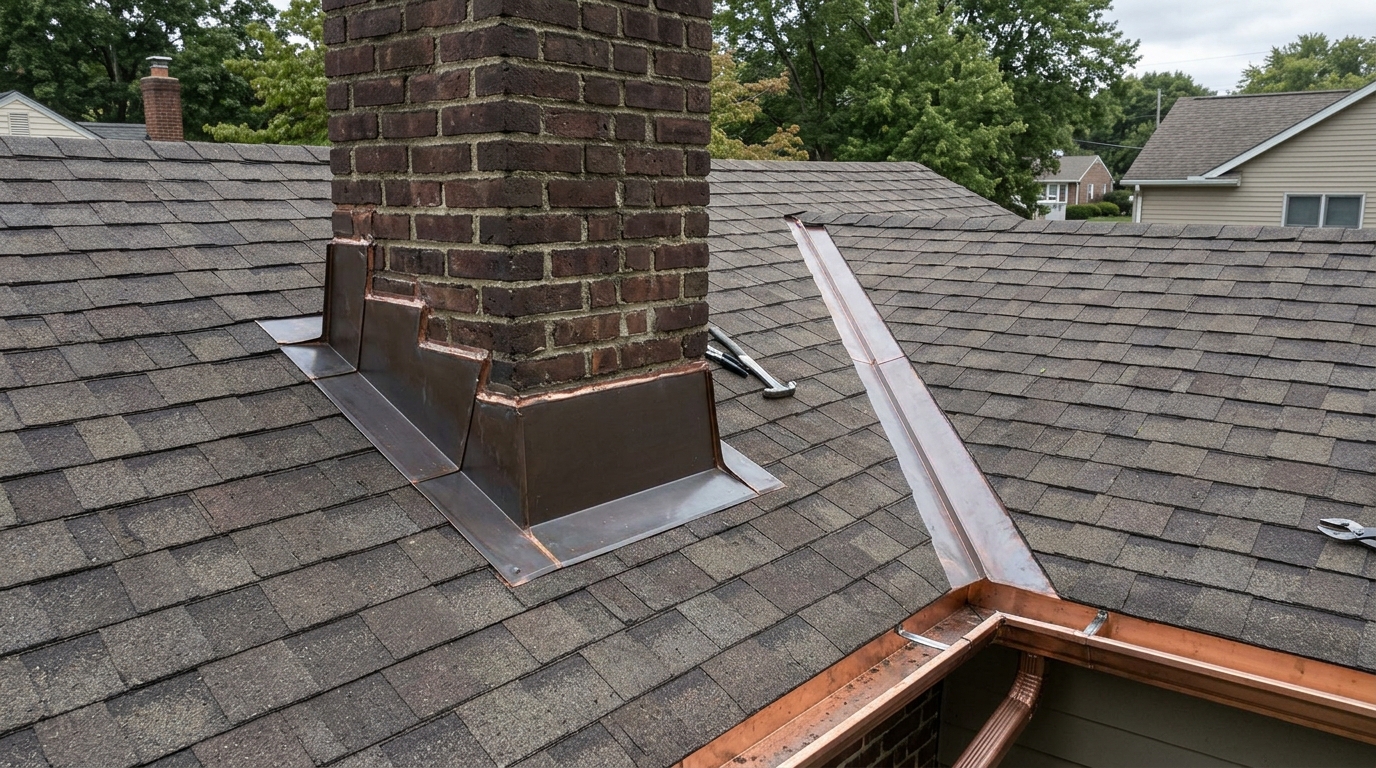
Effective chimney flashing typically combines several pieces, including step flashing along the sides and counterflashing that overlaps the upper edge. The arrangement allows water to pass over the joints instead of behind them, while leaving room for the roof and chimney to move slightly with temperature changes.
Chimney seals also depend on sound connections to the masonry and roofing. If flashing is merely covered with sealant, rather than correctly integrated and overlapped, exposure and movement can cause the seal to deteriorate. The lasting solution is a carefully fitted assembly, not a cosmetic bead.
Forming valley flashing for controlled drainage
A valley receives runoff from two slopes, often making it one of the roof’s busiest drainage routes during heavy rain or snowmelt. Valley flashing must suit the valley’s shape and roofing material, with overlaps and edges arranged to reduce the chance of water backing up beneath the covering.
Debris can also obstruct this channel. Leaves, grit and ice may slow drainage, so even well-made flashing benefits from clear water pathways and periodic inspection. In short, a custom fit helps manage the flow, while maintenance keeps that flow unobstructed.
Matching flashing design to roof conditions
There is no single flashing detail suited to every roof. Roof pitch, the size and position of a chimney, local rainfall, roofing materials and the condition of the underlying structure all affect how water reaches a junction.
A roofer assesses these conditions before selecting and forming the metal. That preparation supports roof integration: the flashing should work with the roof covering, not create a ridge, gap or exposed edge that interrupts drainage.
Selecting materials and connections
Flashing materials must be compatible with nearby roofing components and appropriate to the environment. Metals can react when incompatible materials remain in contact, while thin or unsuitable pieces may deform under stress. Correct selection helps preserve both the flashing and the surfaces it protects.
Installation details matter just as much as material. Overlaps should follow the direction of water, fasteners need suitable placement, and the upper edges of chimney flashing should be secured in a way that resists water entry. A competent installation treats every seam as part of a continuous drainage system.
Comparing common flashing requirements
Although chimneys and valleys both need tailored protection, they handle water in different ways. This distinction helps explain why a solution designed for one junction should not automatically be transferred to another.
| Roof area | Main water challenge | Flashing priority |
|---|---|---|
| Chimney sides | Rain moving down the slope meets a vertical structure. | Overlap step flashing with the roofing and counterflashing. |
| Chimney upslope edge | Runoff can collect behind the chimney. | Guide water around the structure without leaving an entry point. |
| Roof valleys | Runoff from adjoining slopes converges in one channel. | Maintain a continuous, unobstructed path toward the eaves. |
These details are related, but not interchangeable. Good roof integration follows the geometry of each junction and gives water a predictable route off the building.
Preventing leaks through inspection and maintenance
Custom flashings contribute to leak prevention, but their performance depends on the condition of the entire junction. A damaged shingle nearby, deteriorated masonry joint or blocked valley can compromise the drainage system even when the metal itself remains intact.
Inspections should focus on visible changes and signs of moisture inside the building. Early attention can limit damage to roof sheathing, insulation and interior finishes, whereas a leak left unnoticed may spread beyond the original entry point.
Recognizing warning signs around junctions
Several observations can indicate that flashing or its surroundings need professional attention. They do not identify the precise cause on their own, but they help show when a closer assessment is warranted.
Look for the following signs, especially after severe weather or when carrying out routine roof maintenance:
- Loose, lifted or visibly corroded metal around a chimney or valley.
- Cracked sealant, open joints or missing pieces of flashing.
- Water stains, dampness or peeling finishes near the chimney inside the building.
- Leaves, sediment or other debris collecting in a roof valley.
These clues should not be dismissed as cosmetic. Prompt investigation can determine whether the issue lies in the flashing, the roofing material, the masonry or a combination of components.
Maintaining long-term roof durability
Routine checks help keep drainage routes open and identify wear before water reaches concealed parts of the roof. Any repair should preserve the original water-shedding design; simply applying more sealant over a failed joint may hide the symptom without restoring the assembly.
Professional assessment is especially useful where access is difficult, the roof is steep, or the source of moisture is unclear. Carefully designed custom flashings, combined with sound installation and sensible upkeep, provide a durable line of defence at the roof’s most exposed junctions.


