


If you are like me and love reading, you’d always wonder what your own creation would look like. If you love crafting and books, then you are on the right page, come along with us on this journey and discover how to craft your own hardcover book that you can show off to your friends or even gift it to your loved one’s. This might be a great Christmas gift; not only do those who love you get to read a piece that you wrote, but they also get it wrapped in a beautiful cover.
What you’ll need for the craft?
-
- Decorative paper for the end pages- this can be wrapping paper or even card stocks.
-
- Pages to print your story.
-
- Cardboard, bookbinder boards, or chipboard for the covers.
-
- Glue- PVA glue if you can find it, or Elmer’s glue works fine.
-
- Hot glue gun and glue sticks.
-
- Craft knife.
-
- Stapler.
-
- Book cloth or a thin fabric for the cover
-
- Binder clips
-
- Thick decorative paper if you want your book to have a dust jacket.
-
- Paintbrush.
-
- Last but not least, you should have the content of the book ready.

How to craft your book.
Before I start, I like to acknowledge that there are different ways of binding a book. But, I find using glue to be the easiest and less time-consuming method out there. You can also use needles and strings to bind them together, but this is a hassle and takes the fun out of the craft but give the book a more proper finish. If you are a try-hard and a perfectionist, then definitely go ahead and choose the needle and strings route. I advise the newbies to start with the glue binding first before jumping into the deep end.
Steps to craft your book:
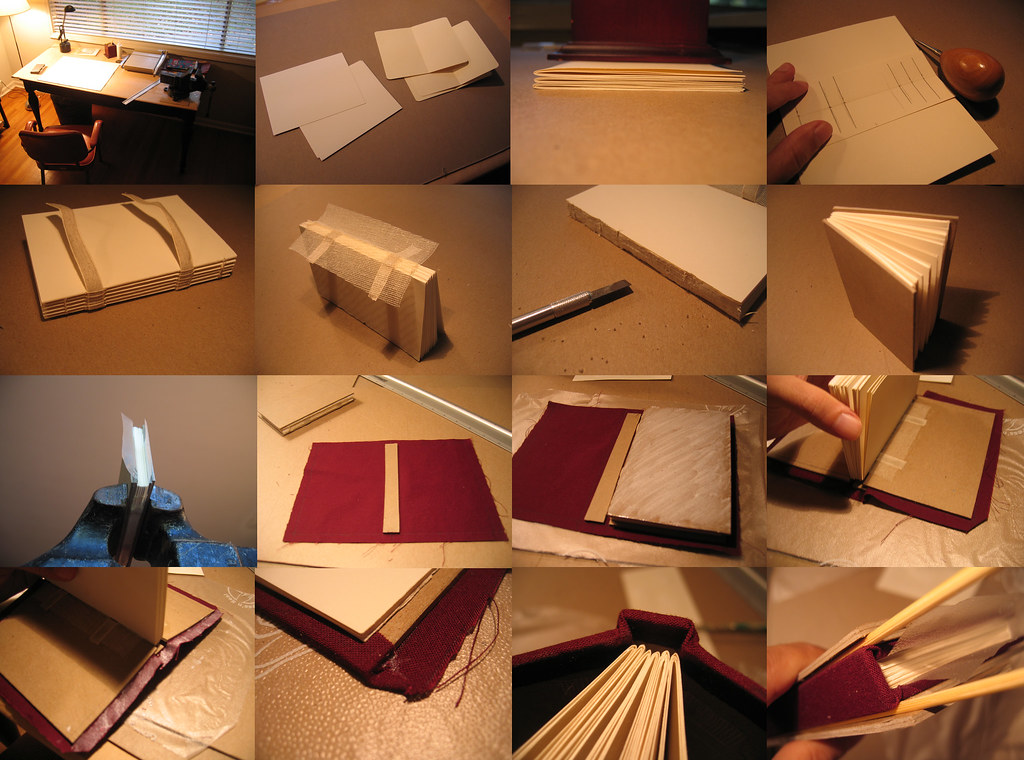
- First, look up a couple of videos or look at some of the hardcover books you have lying on your bookshelf to get a feel of the book’s format. The thickness of the book depends on your content or what you want to put in it.
- Formatting your book. Formatting is one of the most important processes that you need to conquer prior to printing your book. Choose the typeface of your liking and its size, also be aware of the line spacing; you don’t want it too compact, nor do you want the lines to be too separated. I found that 1.5 line spacing is ideal. Don’t forget to add your page numbers and ensure that all new chapters start on a fresh page.
- After finishing the previous step, you’ll save the file in PDF format to avoid any issues while printing. Be sure to add a couple of blank pages, which will be helpful when you’re binding it.
- Once printed, you need to divide your pages into batches of eight and start folding them in two. Now stack eight folios one against another, making sure the pages align and are incorrect order.
- Staple each folio, and remember to stagger your staples to not create a bulge in the spine.
- Arrange the stapled folios in order and flatten them with a heavy item like a skillet. Once flattened, bind together the folios using binder clips and use your glue gun to glue all the folios together. This isn’t a go big or go home kind of deal. Only use enough glue to keep it together.
- For the cover, cut two pieces of cardboard, one for the front and one for the back and a thinner strip for the spine of your book. To create a smooth transition between cover and pages, they should all be the same height and width as your books.
- Paint the cardboard with the glue that you have PVA or Elmer’s and attach the cloth to it to create a more ornate cover and leave it to dry.
- Now you have to attach the whole thing with your glue again, be sparse with the glue. A little goes a long way here. You have to paint glue on the spine and attach that cardboard piece first. Then repeat the same process with the cover and attach them with the pages that you left blank.
- Now is the time to let your creative juice flow. You can make your own design for the cover or even leave it blank and/or decorate it with a dust jacket that you’ve designed online.
Voila, your book is done and you can share it with your loved ones. Sound off in the comment section below and tell us if you want to create your own book using this technique.
2 thoughts on “DIY the book of your dreams.”