

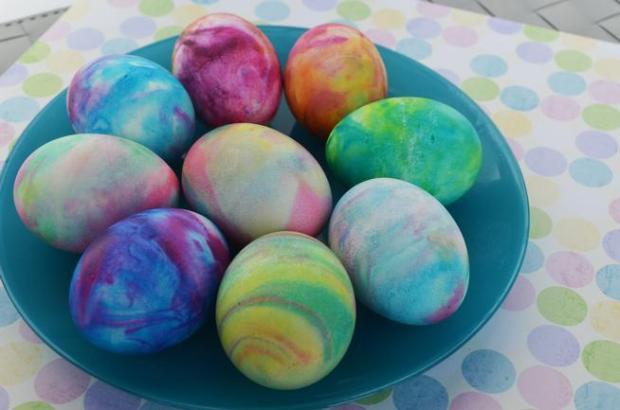
Make your Easter a bit merrier this time by creating shaving cream Easter eggs! A tradition in many families or a new thing to surprise your kids, this DIY project involves everyone. So here it is, make your shaving cream Easter eggs!
For this you will need:
- Hard-Boiled Eggs
- White Vinegar
- Shaving Cream
- Gel Food Color
- Muffin Pan
- Toothpick or Wood Skewers

The Procedure:
- Prepare your eggs by placing them into a shallow container of vinegar to prepare them to take the dye. Create vibrant colors and keep the eggs in the vinegar for at least 20 minutes not longer than that as the shell will become brittle. Rinse off the vinegar and pat dry before continuing!
- Set up the shaving cream in the muffin pan. Fill the cavity approximately 2/3 full with shaving cream. If the pint-size is bigger, then use less as it will look messy. Be sure to use shaving cream and not gel.
- In each cavity add a healthy drop of gel color in two or three complementary colors on top of the shaving cream. Be sure when mixing the colors as it can look good separately but together it can look worst. Use a toothpick or wooden skewer to gently stir the color into the cream. If the color is pale, then add more color. The stir will give a marbled effect on your finished eggs and a more vigorously combined mixture will give you more color on the eggs. Feel free to experiment with the method that suits you the best. You can also use liquid food coloring.
- Create your designs by gently placing your dry egg on top of the colored shaving cream in your muffin tin, trying not to allow the egg to touch the bottom of the tin. Using the toothpick fold over the shaving cream on top of the egg to completely cover it. Do the same for all of your eggs and give the tin a few gentle taps to allow the cream to settle into any air pockets. Allow the eggs to sit in the mixture 10 minutes for more pastel colors and overnight for bolder colors.
- Once the color has set, remove the shaving cream and rinse your eggs directly under the tap. Use your hand to help remove the cream and gently pat dry the eggs with a paper towel and place it on a smooth surface to avoid the transfer of any pattern or texture.
- Decorate your table using the colored eggs and make it look more appealing by adding some dried up branches and leaves.
Happy Easter and dyeing!